ClearPass Configuration
This section is designed to walk a ClearPass administrator through the steps required to get a basic API integration up and running in preparation for the deployment of a mobile app, such as the fictional QuickAccess app.
The mobile app will leverage the ClearPass OAuth2 support to authenticate and authorize a mobile user. All subsequent API calls will be made on behalf of this user and reflect their privileges on the ClearPass server.
Based on this use case the appropriate OAuth2 grant type will be the Password grant type as the app is working on data associated with a specific user.
Step 1. Create API Client
Browsing to the Administration > API Services > API Clients menu option, a new API Client can be defined by clicking on the Create API Client link found in the top right hand corner of the page.
The API Client definition is the method of establishing a relationship between the ClearPass Authorization Server and the client application that is being developed and wishes to leverage the API resources hosted by ClearPass.
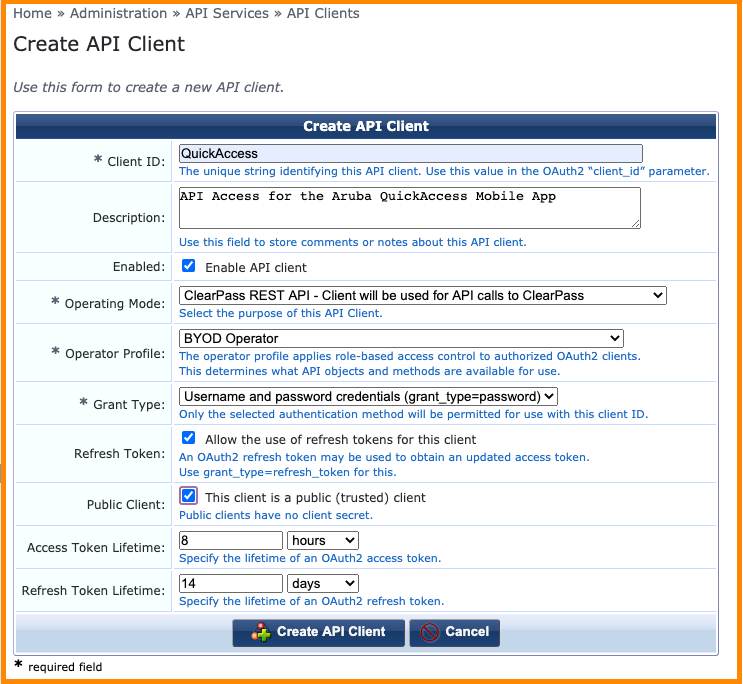
Operator Profile
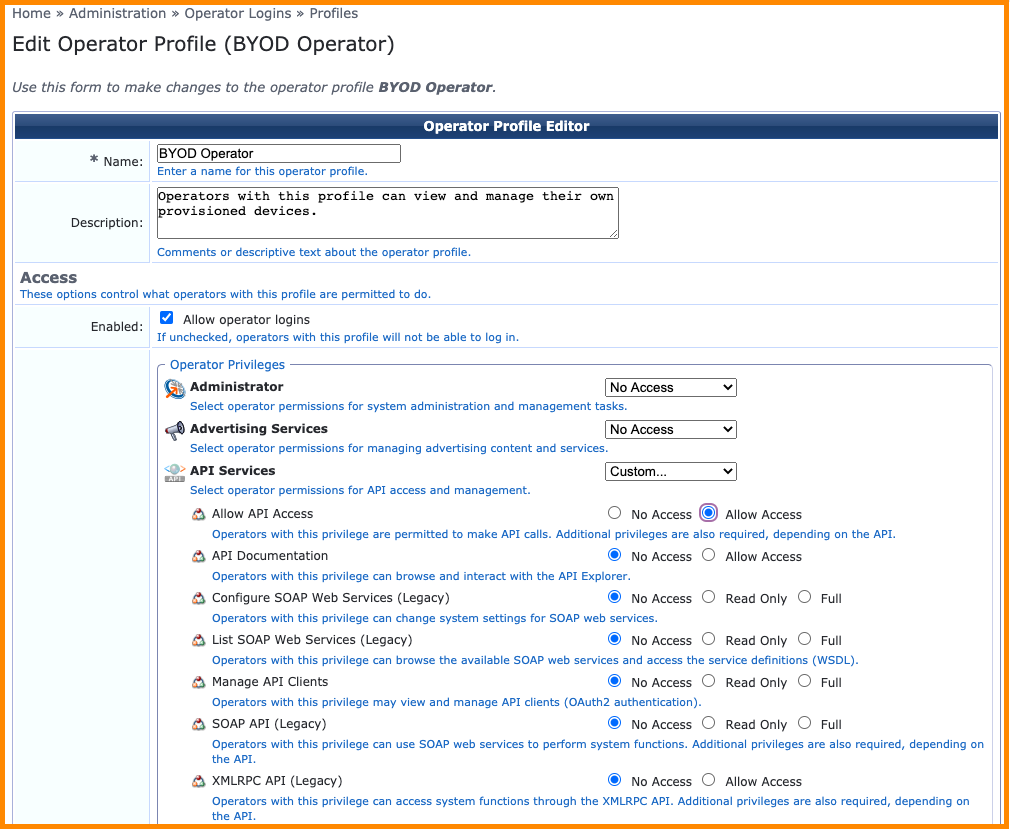
The Operator Profile defines the class of user and privileges associated with the API access that will be granted to a client application based upon successful authorization.
The details of the ClearPass privileges associated with a particular operator profile can be reviewed or modified by browsing to the Administration > Operator Logins > Profiles menu option.
Grant Type
Referring back to the previous OAuth2 technology overview, the API Client definition allows the administrator to currently select from the following supported grant types:
- Client credentials (grant_type=client_credentials)
- Username and password credentials (grant_type=password)
Public Client
In the case that the Password grant type has been selected, the default operation is to create a Client Secret as shown in the example screenshot below.

As discussed in the OAuth2 technology overview, the client secret must also be kept secret to avoid potential security breaches. In some deployment scenarios the app will be deployed as a native mobile app where the operating system and the app itself cannot be guaranteed to be trusted and any credentials stored within the app are at risk of being exposed.
For this reason, the Password grant type offers the ability to define the API client as a public client and in this deployment scenario the app does not need to present the client secret as part of OAuth2 authorization request.
The user of the App needs to make a determination as to whether they trust the native app before entering in their user credentials to login into the service provided.
Refresh Token
The refresh token allows an app a method to recover a short-lived access token from the ClearPass server. The access token is typically short lived to limit the exposure to a compromised token as the attacker has a limited window in which to abuse it.
While the refresh token has not expired, an authorized app is able to make subsequent authorization requests to recover new access tokens and continue to transact API calls.
The administrator can choose to enable refresh token support on each API client definition by checking the option shown in the screenshot above.
Access Token Lifetime
The short lived access token lifetime can be defined for each individual API client to suit the use case of the API access being enabled.
Refresh Token Lifetime
Similarly, if refresh tokens have been enabled for the API client in question, the lifetime of the refresh token can be customized to suit the use case of the API access that is being enabled.
Step 2. Ensure API Access Enabled for users
Each operator profile has the ability to define whether API access is enabled for that class of users. This setting will override any individual ClearPass privileges that may have been enabled through the Operator profile elsewhere so it is critical to ensure this option is enabled for the target users of the app.
Step 3. Verify User Account
As the API client has been configured based on the Password grant type, all API calls will be to be executed with the context of a user known to ClearPass. Although various external user databases are supported by ClearPass, this example will just leverage the local user database.
From the ClearPass Policy Manager administration user interface, select the Configuration > Identity > Local Users menu option to verify an account already exists and belongs to the appropriate Operator Profile.
If an appropriate account doesn’t exist a new one can be quickly created by clicking on the Add button in the top right corner and filling out the required fields as shown below.
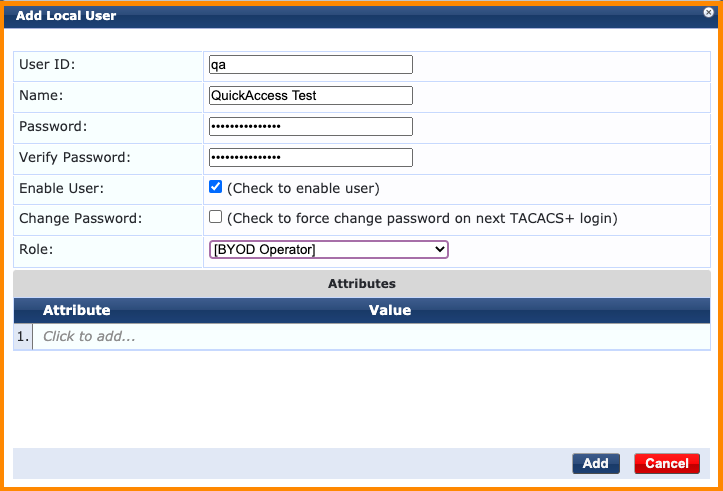
Click the Add button to commit the new user to the ClearPass database.
Step 4. Create Policy Manager Service
In order for ClearPass Policy Manager to successfully authenticate the OAuth2 authorization requests for any of the configured API clients, a new service definition must be created. ClearPass Policy Manager has a built in wizard for quickly creating the required service definition to support OAuth2 based API authorization and this can be created by browsing to the Configuration > Service Templates & Wizards menu option from within the administration interface.
Filter the Application Templates, and then select the available service definition wizards the OAuth2 API User Access wizard can be found towards the bottom.
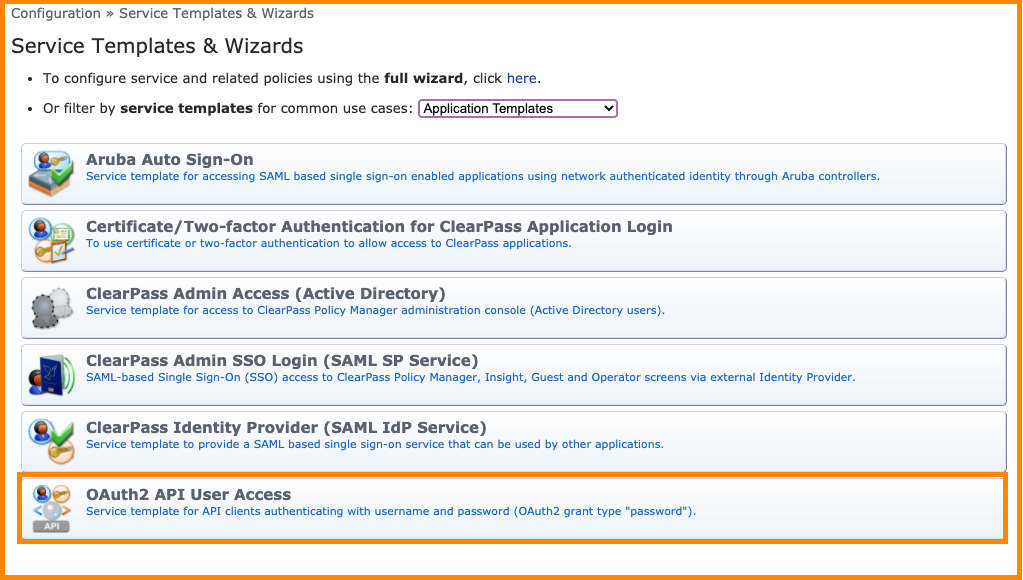
Click on the OAuth2 API User Access wizard and fill out a descriptive name for the service so it can be easily identified in the Policy Manager’s service list in the future. Click the Add Service button to commit the service to the policy engine.

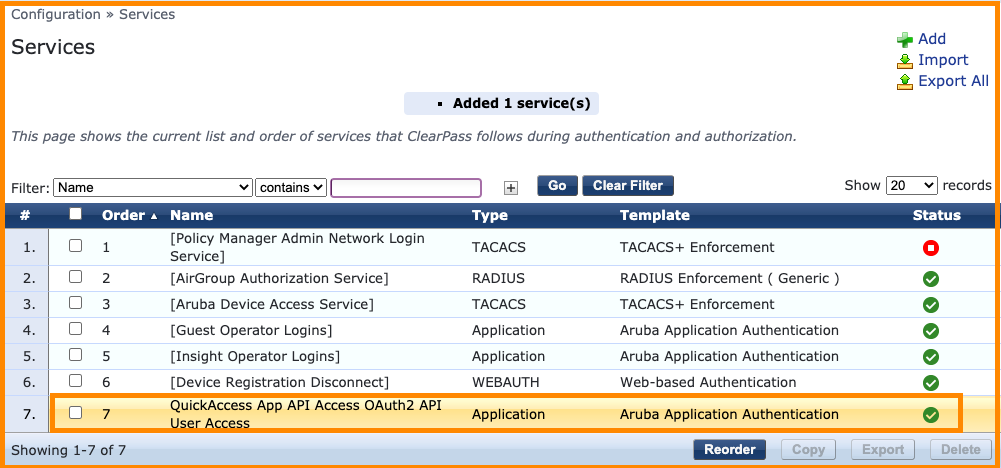
Now referencing the ClearPass Policy Manager’s service list, the new OAuth2 service definition should be available and enabled for API access as shown in the screenshot below.
Step 5. Test API Authorization
The ClearPass OAuth2 authorization endpoint is available using the following details:
| Location | Method | Content Type | Payload |
|---|---|---|---|
| /api/oauth | POST | JSON | grant_type, username, password, client_id, client_secret |
Note client_secret required if the API client definition is not configured as public client.
In order to test the OAuth2 API authorization on ClearPass, any basic HTTP client can be used to craft the API call. There are many browser plugins (RESTClient, Postman, etc.) and command line tools available that support this style of API integration.
The following example uses a widely deployed command line tool found in many operating systems called cURL. More details on the cURL client can be found on the cURL website.
curl -X POST "https://clearpass.hostname/api/oauth" \
    -H "Content-Type: application/json" \
    -d '{"grant_type": "password", "username": "qa", "password": "abc123", "client_id": "QuickAccess"}' \
    -m 30 \
    -v \
    -k
Note The Windows version of cURL you may need to remove the backslashes ( \ ) and collapse the entire command into a single line.
NOTE An alternative to using a 3rd-party tool exists within ClearPass itself. The alternative is called the API Explorer and is available at https://<clearpass.hostname>/api-docs. An explanation of how to use the API Explorer is presented in Appendix A.
If the configuration of the ClearPass server is correct, a JSON object similar to the one below should be returned. The JSON object contains the following attribute value pairs:
- access_token : to token associated with the authorized user
- expires_in : the above access token will expire in x seconds
- token_type : bearer token will be included in all subsequent API calls
- scope : reserved for future use in ClearPass
- refresh_token : to be stored to recovering a new access token on expiry
{"access_token":"81d3136c9025c394222d6202375924d30330ce9a","expires_in":28800,"token_type":"Bearer","scope":null ,"refresh_token":"2fb63c38824eb2c0c75bf3894eda9109019b8c86"}
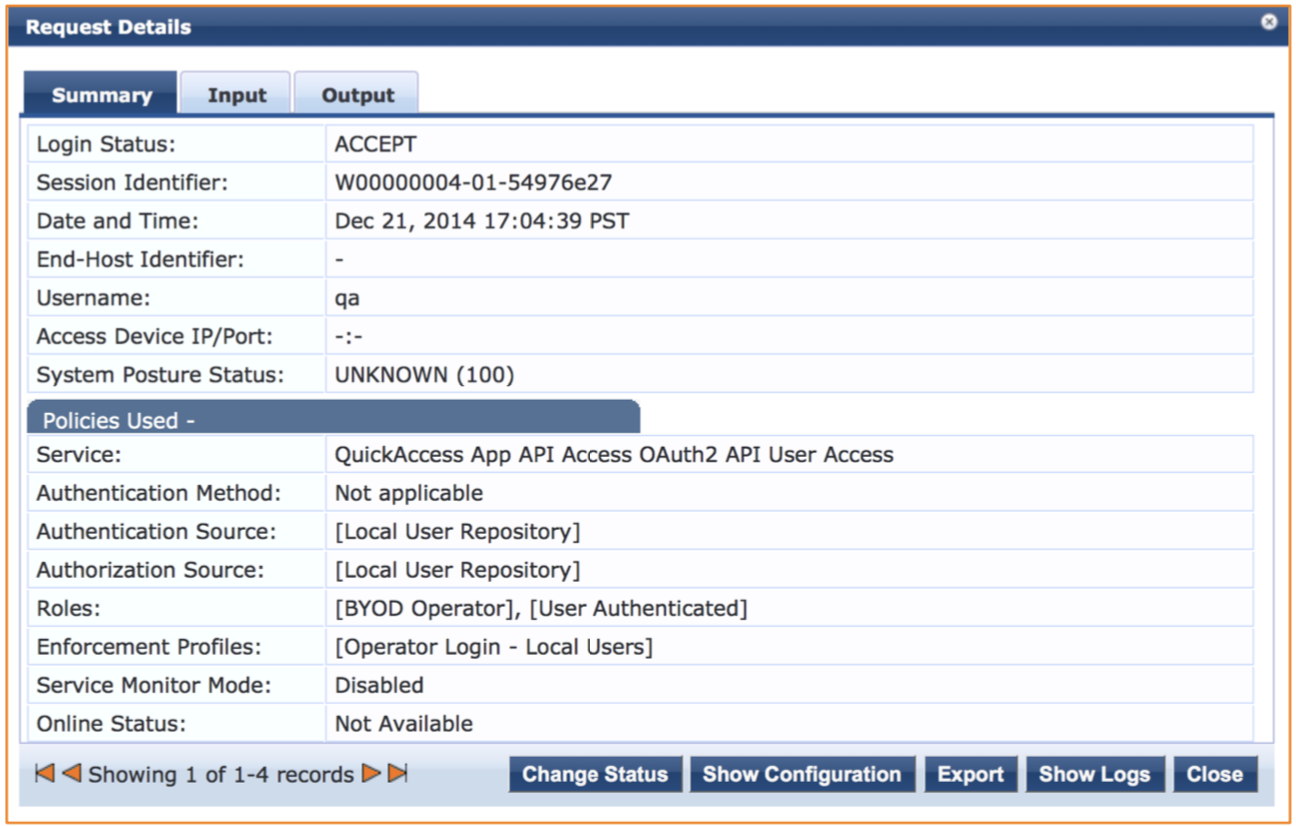
Returning to the ClearPass Policy Manager administration interface, the Monitoring > Live Monitoring > Access Tracker menu option can be selected and the successful OAuth2 transactions can be reviewed.
Step 6. Test API Transaction
Now that the OAuth2 authorization step is complete and an access token has been successfully retrieved from the ClearPass server, any required API calls can now be made to the server.
In order to reference the context of the authorized user, the access token must be included in every subsequent API call. As per the OAuth2 specification, this access token must be included in the HTTP Authorization Header in the following format.
Authorization: Bearer <access_token>
Using the cURL command again, an API call can be made to a defined API endpoint that will return all of the ClearPass privileges associated with the user authorized and associated with the given access token.
| Location | Method | Content Type | Payload |
|---|---|---|---|
| /api/oauth/privileges | GET | n/a | n/a |
curl -X GET "https://clearpass.hostname/api/oauth/privileges" \
    -H "Accept: application/json" \
    -H "Authorization: Bearer 81d3136c9025c394222d6202375924d30330ce9a" \
    -m 30 \
    -v \
    -k
Note: if you are using the Windows version of cURL you may need to remove the slashes ( \ ) and collapse the entire command into a single line.
The following JSON object shows the privileges associated with the authorized user on the ClearPass server.
{
    "privileges": [
        "#guest_sessions_history",
        "#guest_show_details",
        "#mdps_view_own_certificate",
        "?api_index",
        "?guestmanager",
        "?mdps_index",
        "apigility",
        "change_expiration",
        "create_multi",
        "create_user",
        "full-user-control",
        "guest_multi",
        "guest_sessions",
        "guest_users",
        "mac_create",
        "mac_list",
        "mdps_own_device_delete",
        "mdps_own_device_disable",
        "mdps_own_device_enable",
        "mdps_own_device_manage",
        "mdps_shared_device_delete",
        "mdps_shared_device_disable",
        "mdps_shared_device_enable",
        "mdps_shared_device_manage",
        "remove_account",
        "reset_password"
    ]
}
Note that some of the privilege names contain a prefix. This prefix indicates the level of access granted for that particular privilege.
- # prefix: Read Only Access
- ? prefix: Allowed Access
- No prefix: Full Access
At this point successful API access has been established and verified and the app developers should be in a position to start development and testing against the ClearPass API service.
Updated about 2 years ago