
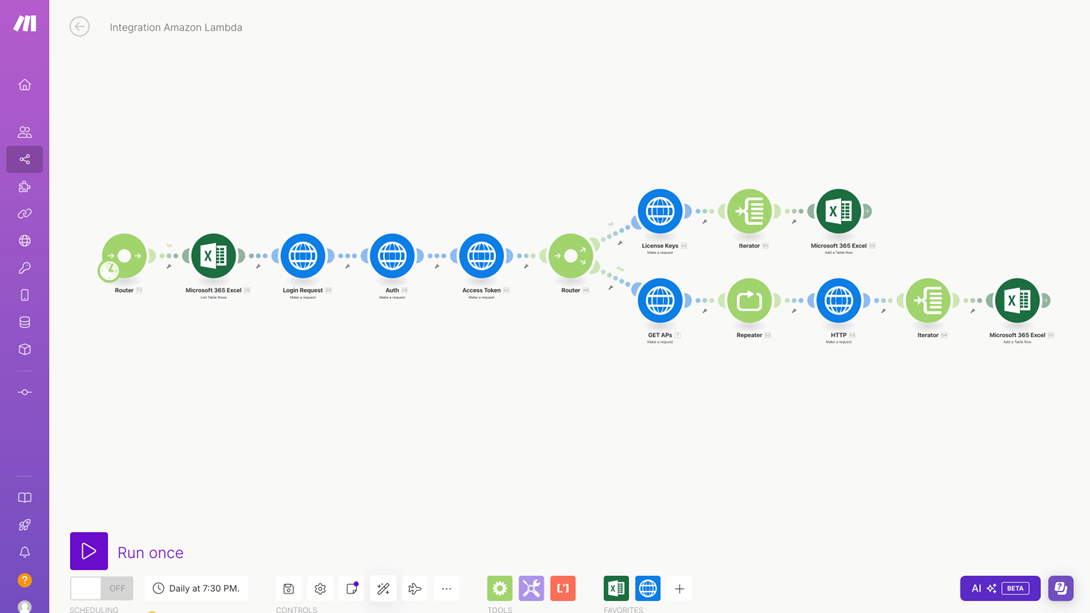
Create Excel Files using REST APIs in Make
This section will provide step-by-step instructions for creating personalized CSV reports using REST APIs from Aruba Central. We will be generating the access token within the workflow, so all required information for authentication and API calls must be provided.
This section demonstrates how to generate reports based on the information retrieved from API requests.
The first example will show how to generate a report on all the license keys, including details such as start and end dates. This example makes a single request and iterates through the response to populate the Excel table, as all necessary information can be retrieved in one HTTP request.
The second example will illustrate how to generate a report with a list of access points, including details such as model and their status. This example requires multiple requests, as the API can only retrieve a maximum of 50 records per request. For each request, the response will be iterated to correctly populate the Excel table with the retrieved data.
Gathering Information to use API
-
Cluster URL
- Each cluster in Aruba Central has a unique Domain Name. You can verify the cluster you are in through: “Global” > “Organization” > “Platform Integration” > “API Gateway” > “REST API” > “All Published APIs”
Below is the list of domain names for the clusters available as of Version 2.5.8.
Region Domain Name US-1 app1-apigw.central.arubanetworks.com US-2 apigw-prod2.central.arubanetworks.com US-East1 apigw-us-east-1.central.arubanetworks.com US-WEST-4 apigw-uswest4.central.arubanetworks.com EU-1 eu-apigw.central.arubanetworks.com EU-Central2 apigw-eucentral2.central.arubanetworks.com EU-Central3 apigw-eucentral3.central.arubanetworks.com Canada-1 apigw-ca.central.arubanetworks.com China-1 apigw.central.arubanetworks.com.cn APAC-1 api-ap.central.arubanetworks.com APAC-EAST1 apigw-apaceast.central.arubanetworks.com APAC-SOUTH1 apigw-apacsouth.central.arubanetworks.com UAE-NORTH1 apigw-uaenorth1.central.arubanetworks.com -
Username and Password
-
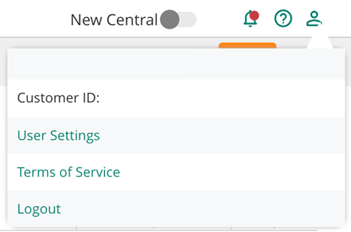
Customer ID
-
It is the Aruba Central account identification; you can find it by clicking in the “User” icon.
-
-
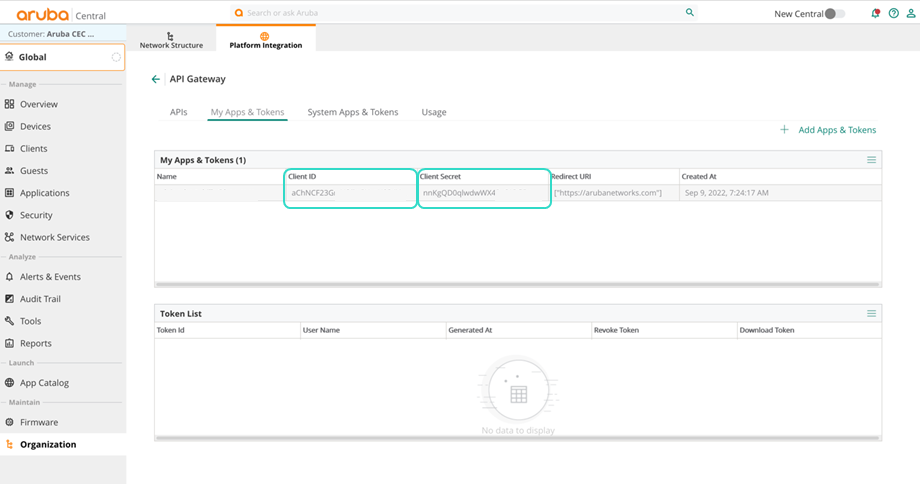
Client ID and Client Secret
-
The client ID is unique for every user. You need to generate an Access Token from Aruba Central at least once to obtain this unique Client ID and Client Secret. Once the token is generated, the Client ID and Client Secret will remain the same, even if the token expires, unless they are manually deleted from the account.
-
You can generate the Access Token through:
- “Global” > “Organization” > “Platform Integration” > “API Gateway” > “REST API” > “My Apps and Tokens” > “+ Add Apps & Tokens”
-
A new window will be displayed. Click on “Generate.”
-
Once the token is generated, you will receive the Client ID and Client Secret. Make sure to copy the entire Client ID and Client Secret.
-
We will retrieve all necessary information through a table in an Excel spreadsheet stored in OneDrive. It is recommended to create a dedicated folder for this integration, as it will simplify the process of integrating and storing all related files.
Access Aruba Central Information
- Create a table within an Excel spreadsheet with all the information required to make an API call. (The information required is detailed in the previous sections of this document.) It is important that the information is formatted as a table so Make can properly retrieve the data.

- Create a new Scenario in Make by following the steps previously described in this document.
- Establish a connection to your “Microsoft 365” Account
- Add a new Module to your scenario and select “List Table Rows” from “Microsoft 365 Excel”
- Microsoft 365 Excel > List Table Rows > Add
- In the New window, select “Create a Connection” and enter a name for your connection.
- You will be redirected to the Microsoft 365 login page.
- Once logged in, accept the connection by clicking on the “Allow” button.
- Add a new Module to your scenario and select “List Table Rows” from “Microsoft 365 Excel”
- Extract the authentication information from the table in the Excel file previously created:
- Add a new Module to your scenario and select “List Table Rows” from “Microsoft 365 Excel” (in case it was not saved when creating the connection):
- Microsoft 365 Excel > List Table Rows > Add.
- From the dropdown list, select the connection previously established.
- Under the “Select a method” option, select “Select from the list” from the dropdown list.
- Under “Choose your OneDrive location,” select the best option to find the previously created file.
- Under “Workbook”, navigate to the correct folder and find the correct file name by selecting the “Choose a file” option.
- From the dropdown list in “Worksheet”, select the sheet name in the Excel file that has the table.
- From the dropdown list under “Table”, select the correct table
- It is important that this is formatted as a table, or it will not be identified as one.
- In the “Limit” option, select 1 to retrieve the first row from the table.
- If you are using the same table for multiple accounts, make sure to select the row number that corresponds to the account information you want to retrieve.
- Before you add a new module, make sure to save and run the scenario so you can use the information in the Excel file in the next modules.
- Add a new Module to your scenario and select “List Table Rows” from “Microsoft 365 Excel” (in case it was not saved when creating the connection):
Generate Access Token
Login into Aruba Central to generate an access token through an HTTP request:
-
Add a “Make a Request” module:
- HTTP > Make a Request.
-
Select “No” for “Evaluate all states as errors (except for 2xx and 3xx).”
-
Enter the full URL for the request:
- First, select the “Cluster URL” variable from the Excel file under the Starred option by selecting the star icon and navigating to the information retrieved from the table.
-
Enter the login-specific URL: oauth2/authorize/central/api/login.
-
From the dropdown list, select the “POST” “Method”.
-
Add the Client ID as a parameter for the request:
- Under the “Query String,” select the option “Add Parameter.”
- For Item 1, enter “client_id” as the name and select the “Client ID” variable from the Excel file as the value.
-
Select the option “Raw” for the Body Type from the dropdown list.
-
Select “JSON (application/json)” for the “Content Type”.
-
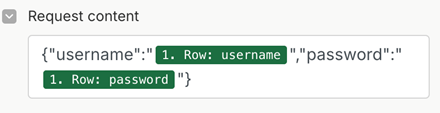
For the “Request content,” provide a JSON object including the username and password.
-
Make sure to enter the key as “username” and for the value, select the variable from the Excel file for the username.
-
Add a second key for “password” and select the password variable for the value. Ensure the JSON format matches the example below:
-
{"username": "[username variable]", "password": "[password variable]"}
-
-
-
Select “Yes” for the “Parse response” option.
-
Save the scenario and run it once to validate that it was a successful request
Authenticate in Aruba Central to Generate an Access Token through an HTTP request:
-
Add a “Make a Request” module:
- HTTP > Make a Request.
-
Select “No” for “Evaluate all states as errors (except for 2xx and 3xx).”
-
Enter the full URL for the request:
- First, select the “Cluster URL” variable from the Excel file under the Starred option by selecting the star icon and navigating to the information retrieved from the table.
-
Enter the authorization-specific URL: oauth2/authorize/central/api.
-
From the dropdown list, select the “POST” “Method”.
-
Add the CSRF token received from the previous request as a header
-
Under “Headers”, select the option “Add a header”
-
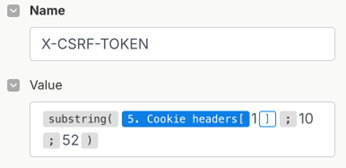
For “Item 1”, enter “X-CSRF-TOKEN” as the name.
-
For the value, parse the Cookie headers by selecting “substring”, under “Text and binary functions” by selecting the A icon
-
Inside the substring function, select the “Cookie headers [1]” variable received from the previous request. Expand the options, then select the “[1]” option. Once the variable is selected enter “1” between the brackets
-
After the first semicolon, enter the number “10”, and after the second semicolon, enter the “52”. This will correctly parse the cookie header needed for the authentication, The value should look like the image shown below:
-
-
-
Add the Content Type as a header
- Under the “Headers”, select the option “Add a header”
- For “Item 2”, enter “content-type” as the name.
- For the value, enter “application/json”
-
Add the Cookie received from the previous request as a header
-
Under “Headers”, select the option “Add a header”
-
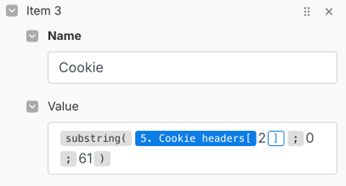
For “Item 3”, enter “Cookie” as the name.
-
For the value, parse the Cookie headers by selecting “substring”, under “Text and binary functions” by selecting the A icon
-
Inside the substring function, select the “Cookie headers [1]” variable received from the previous request. Expand the options, then select the “[1]” option. Once the variable is selected enter “2” between the brackets
-
After the first semicolon enter the number “0” and after the second semicolon, enter the “61”. This will correctly parse the cookie header needed for the authentication, The value should look like the image shown below:
-
-
-
Add the Client ID as a parameter for the request:
- Under the “Query String,” select the option “Add a parameter.”
- For Item 1, enter “client_id” as the name and select the “Client ID” variable from the Excel file as the value.
-
Add the Response Type as a parameter for the request:
- Under the “Query String,” select the option “Add a parameter.”
- For Item 2, enter “response_type” as the name and enter “code” as the value.
-
Add the Scope as a parameter for the request:
- Under the “Query String,” select the option “Add a parameter.”
- For Item 3, enter “scope” as the name and enter “all” as the value.
-
Select the option “Raw” for the Body Type from the dropdown list.
-
Select “JSON (application/json)” for the “Content Type”.
-
For the “Request content,” provide a JSON object including the username and password.
-
Make sure to enter the key as “customer_id” and for the value, select the variable from the Excel file for the customer id. Ensure the JSON format matches the example below:
-
{"customer_id": "[customer ID variable]"}

-
-
-
Select “Yes” for the “Parse response” option.
-
Save the scenario and run it once to validate that it was a successful request
Generate an Access Token Through an HTTP Request
-
Add a “Make a Request” module:
- HTTP > Make a Request.
-
Select “No” for “Evaluate all states as errors (except for 2xx and 3xx).”
-
Enter the full URL for the request:
- First, select the “Cluster URL” variable from the Excel file under the Starred option by selecting the star icon ( ) and navigating to the information retrieved from the table.
- Enter the authorization-specific URL: oauth2/token.
-
From the dropdown list, select the “POST” “Method”.
-
Add the Client ID as a parameter for the request:
- Under the “Query String,” select the option “Add Parameter.”
- For Item 1, enter “client_id” as the name and select the “Client ID” variable from the Excel file as the value.
-
Add the Grant Type as a parameter for the request:
- Under the “Query String,” select the option “Add Parameter.”
- For Item 2, enter “grant_type” as the name and enter “authorization_code” as value
-
Add the Client Secret as a parameter for the request:
- Under the “Query String,” select the option “Add Parameter.”
- For Item 3, enter “client_secret” as the name and select the “client secret” variable from the Excel file as the value.
-
Add the Code received from the previous request as a parameter for the request:
-
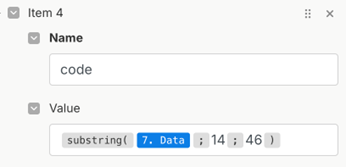
For “Item 4”, enter “Code” as the name.
-
For the value, parse the Cookie headers by selecting “substring”, under “Text and binary functions” by selecting the A icon
-
Inside the substring function, select the “Data” variable received from the previous request.
-
After the first semicolon enter the number “14” and after the second semicolon, enter the “46”. This will correctly parse the cookie header needed for the authentication, The value should look like the image shown below:
-
-
-
Select “Yes” for the “Parse response” option.
-
Save the scenario and run it once to validate that it was a successful request.
*The token generated will be sent as a parameter in all the API requests to Aruba Central
Generate License Key Report
Populate an Excel file with a table that includes all the information about the License Keys in the account, including the following fields:
• Customer ID
• License Type
• Subscription Key
• Status
• Start Date
• End Date
• Total
-
Create a table within an Excel spreadsheet that includes all the fields mentioned above. Ensure that the data is formatted as a table to be recognized as such.

-
Get License Key information through an HTTP Request:
- Add a “Make a Request” module:
- HTTP > Make a Request.
- Select “No” for “Evaluate all states as errors (except for 2xx and 3xx).”
- Enter the full URL for the request:
- First, select the “Cluster URL” variable from the Excel file under the Starred option by selecting the star icon and navigating to the information retrieved from the table.
- Enter the authorization-specific URL: /platform/licensing/v1/subscriptions.
- From the dropdown list, select the “GET” “Method”.
- Add the Access Token as a parameter for the request:
- Under the “Query String,” select the option “Add Parameter.”
- For Item 1, enter “access_token” as the name and select the “data: access_token” variable from the previous request.
- Select “Yes” for the “Parse response” option.
- Save the scenario and run it once to validate that it was a successful request.
- Add a “Make a Request” module:
-
Iterate through the response from the last HTTP request to extract all the License Key information and populate the Excel file accordingly.
-
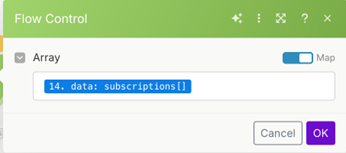
Add a “Iterator” module:
- Flow control > Iterator
-
In the “Array” option, select the “data: subscriptions [ ]” variable received from the last request
-
-
Populate Excel table with the HTTP Response and generate report
-
Add a “Add a Table Row”
- Microsoft 365 Excel > Add a Table Row
-
From the dropdown list, select the connection previously established.
-
Under the “Select a method” option, select “Select from the list” from the dropdown list.
-
Under “Choose your OneDrive location,” select the best option to find the previously created file.
-
Under “Workbook”, navigate to the correct folder and find the correct file name by selecting the “Choose a file” option.
-
From the dropdown list in “Worksheet”, select the sheet name in the Excel file that has the table.
-
From the dropdown list under “Table”, select the correct table,
- It is important that this is formatted as a table, or it will not be identified as one.
-
The rows will be populated with the columns retrieved directly from the table in your file. For each column, select the respective variable from the iterator output that matches the column.
-
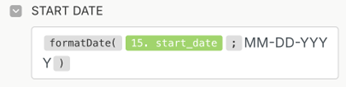
For the Start Date and End Date, the output is in a timestamp format. Since this format is used in programming, you will need to convert it to a human-readable format.
-
To format the date, parse the timestamp by selecting “Format Date” under “Date and Time” by clicking the calendar icon.
-
Select the date variable that corresponds, followed by “MM-DD-YYYY” after the semicolon. This will correctly format the date for use in an Excel file. The value should resemble the image shown below:
-
-
-
Generate an Access Point inventory report
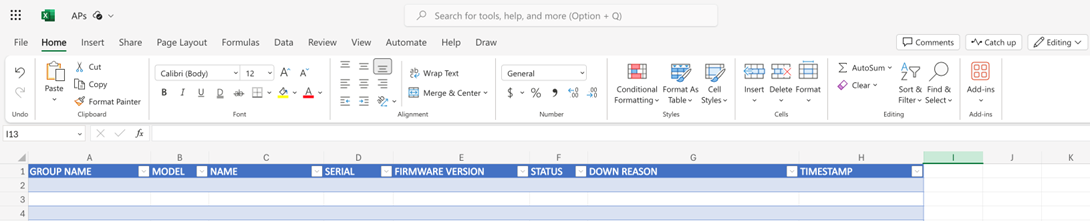
Populate an Excel file with a table that includes all the information about the Access Point in the account, including the following fields.
• Group Name
• Model
• Name
• Serial
• Firmware Version
• Status
• Down Reason
• Timestamp
-
Create a table within an Excel spreadsheet that includes all the fields mentioned above. Ensure that the data is formatted as a table to be recognized as such.
-
Get Access Point list through an HTTP Request to get total number of devices:
- Add a “Make a Request” module:
- HTTP > Make a Request.
- Link the module to the third HTTP request (the request that generates the access token), and a “Router” module will automatically appear to allow the use of the same authentication request for multiple API calls.
- Select “No” for “Evaluate all states as errors (except for 2xx and 3xx).”
- Enter the full URL for the request:
- First, select the “Cluster URL” variable from the Excel file under the Starred option by selecting the star icon and navigating to the information retrieved from the table.
- Enter the authorization-specific URL: /monitoring/v2/aps.
- From the dropdown list, select the “GET” “Method”.
- Add the Access Token as a parameter for the request:
- Under the “Query String,” select the option “Add Parameter.”
- For Item 1, enter “access_token” as the name and select the “data: access_token” variable from the previous request.
- Add the SKU Type as a parameter for the request
- Under the “Query String,” select the option “Add Parameter.”
- For Item 2, enter “sku_type” as the name and enter “IAP” as the value.
- Select “Yes” for the “Parse response” option.
- Save the scenario and run it once to validate that it was a successful request.
- Add a “Make a Request” module:
-
Repeat the API call to get the full list of APs as the API output can efficiently return 50 devices per response
-
Add a “Repeater” module
- Flow Control > Repeater
-
Set the initial value to 0
-
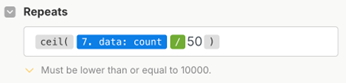
Set the Repeats to the number of times needed to get full list in increments of 50
-
First, select the “ceil” function from the Math Functions by selecting the X ico
-
Inside the substring function, select the “data: count” variable received from the previous request.
-
Add the Division operator “/” by selecting the X icon
-
After the division sign (/) enter “50”to get the exact number of repetitions needed. The value should look like the image shown below:
-
-
Enable the option “Show advanced settings”
-
Set the Step value to 1
-
-
Get the information of all the Access Points through an HTTP Request:
-
Add a “Make a Request” module:
- HTTP > Make a Request.
-
Select “No” for “Evaluate all states as errors (except for 2xx and 3xx).”
-
Enter the full URL for the request:
- First, select the “Cluster URL” variable from the Excel file under the Starred option by selecting the star icon and navigating to the information retrieved from the table.
- Enter the authorization-specific URL: /monitoring/v2/aps.
-
From the dropdown list, select the “GET” “Method”.
-
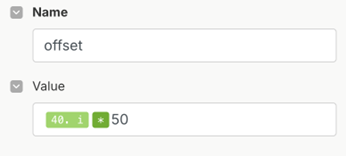
Add the offset value as a parameter for the request:
-
Under the “Query String,” select the option “Add Parameter.”
-
For Item 1, enter “offset” as the name and for the value multiply the iterator previously created by 50 by entering “(i * 50)” selecting the “I” variable from the previous module. The value should look like the image below:
-
-
Add the limit 50 as a parameter for the request:
- Under the “Query String,” select the option “Add Parameter.”
- For Item 2, enter “limit” as the name and “50” for the value.
-
Add the AP as the SKU type as a parameter for the request:
- Under the “Query String,” select the option “Add Parameter.”
- For Item 3, enter “sku_type” as the name and “IAP” for the value.
-
Add the Access Token as a parameter for the request:
- Under the “Query String,” select the option “Add Parameter.”
- For Item 4, enter “access_token” as the name and select the “data: access_token” variable from the previous request.
-
Select “Yes” for the “Parse response” option.
-
Save the scenario and run it once to validate that it was a successful request.
-
-
Iterate through the response from the last HTTP request to extract all the License Key information and populate the Excel file accordingly.
-
Add a “Iterator” module:
- Flow control > Iterator
-
In the “Array” option, select the “data: aps [ ]” variable received from the last request

-
-
Populate Excel table with the HTTP Response and generate report
- Add a “Add a Table Row”
- Microsoft 365 Excel > Add a Table Row
- From the dropdown list, select the connection previously established.
- Under the “Select a method” option, select “Select from the list” from the dropdown list.
- Under “Choose your OneDrive location,” select the best option to find the previously created file.
- Under “Workbook”, navigate to the correct folder and find the correct file name by selecting the “Choose a file” option.
- From the dropdown list in “Worksheet”, select the sheet name in the Excel file that has the table.
- From the dropdown list under “Table”, select the correct table,
- It is important that this is formatted as a table, or it will not be identified as one.
- The rows will be populated with the columns retrieved directly from the table in your file. For each column, select the respective variable from the iterator output that matches the column.
- For the Timestamp column, we will be adding the date and time in which the information was retrieved.
- We will add the date and time, by selecting “now” under “Date and Time” by clicking the calendar icon.
- Add a “Add a Table Row”
Updated 12 months ago