
Making API Calls
In this guide, you'll learn how to make your first REST API call to HPE Aruba Networking Central using our API Reference Guide . The API Reference Guide provides you with a direct interface for making API calls to HPE Aruba Networking Central from your browser.
Follow these 5 simple steps to make your first API call directly from the API Reference Guide:
1. Select the API Endpoint
Navigate to the API Reference Guide & choose the Get a list of devices API . This is a GET request that retrieves a list of devices from Central.
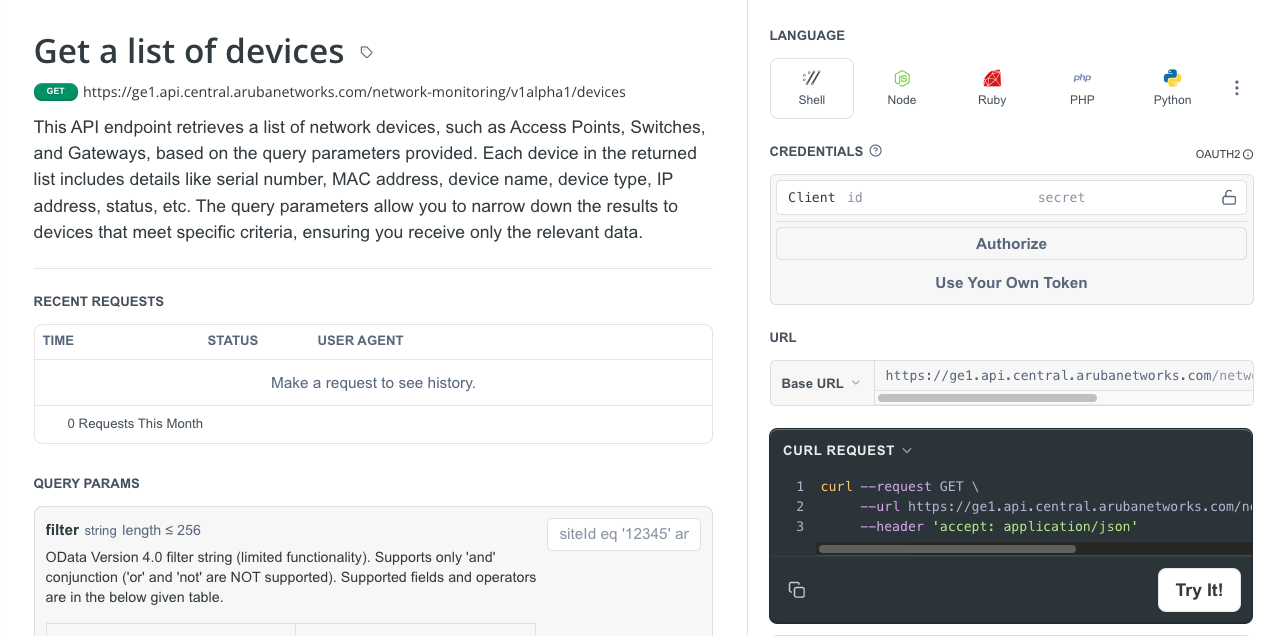
2. Provide your Credentials
To authenticate your API requests in Central, you have two options based on your preferred workflow:
Option A - Use API Client Credentials
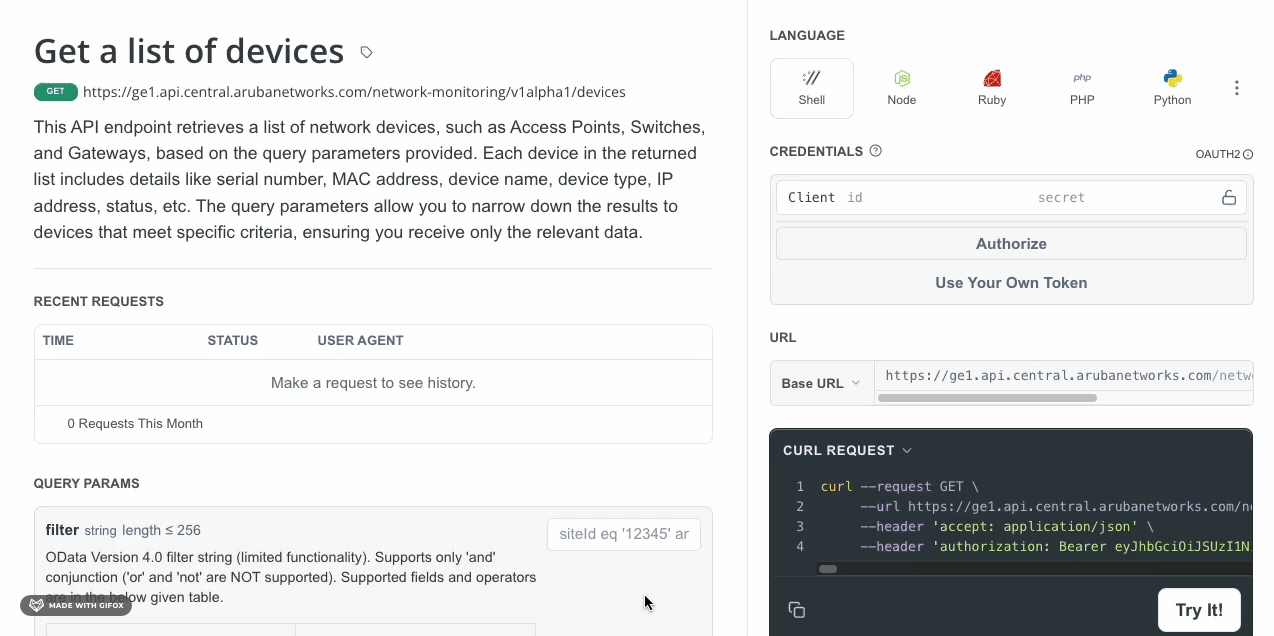
Enter your API client credentials(client_id and client_secret) for Central in the Credentials section and click on the Authorize button. This will generate an access token, which is used to authenticate your API requests. You can find the steps to create your API client credentials for Central from here
Option B - Use Your Own Access Token
If you've already generated an access token for Central, you can click on Use Your Own Token and paste it directly into the Bearer Token Field. If you don't have an access token yet, follow the steps in the Generate Access Token guide to create one.
Once a token is provided - either by generating it or pasting it- it will be stored in the browser for the duraction of your session. This allows your to seamlessly use the token across other API endpoints in the API reference.
3. Choosing the Right Base URL
Select the correct base URL from the URL dropdown. This URL will be based on the geographical cluster in which your Central account is provisioned. For instructions on how to locate your Base URL, see Finding Your Base URL in Central.
4. Configure API Parameters(Optional)
Some API endpoints support query parameters to customize your request. You can configure these parameters by filling in the fields under Query Params section for each endpoint.
For example, for the Get a list of devices API, filter, sort, next, and limit can be optionally configured.
5. Making API Request
Once you've set the endpoint, base URL, access token, and any necessary API parameters click on the "Try It" button to send the request.
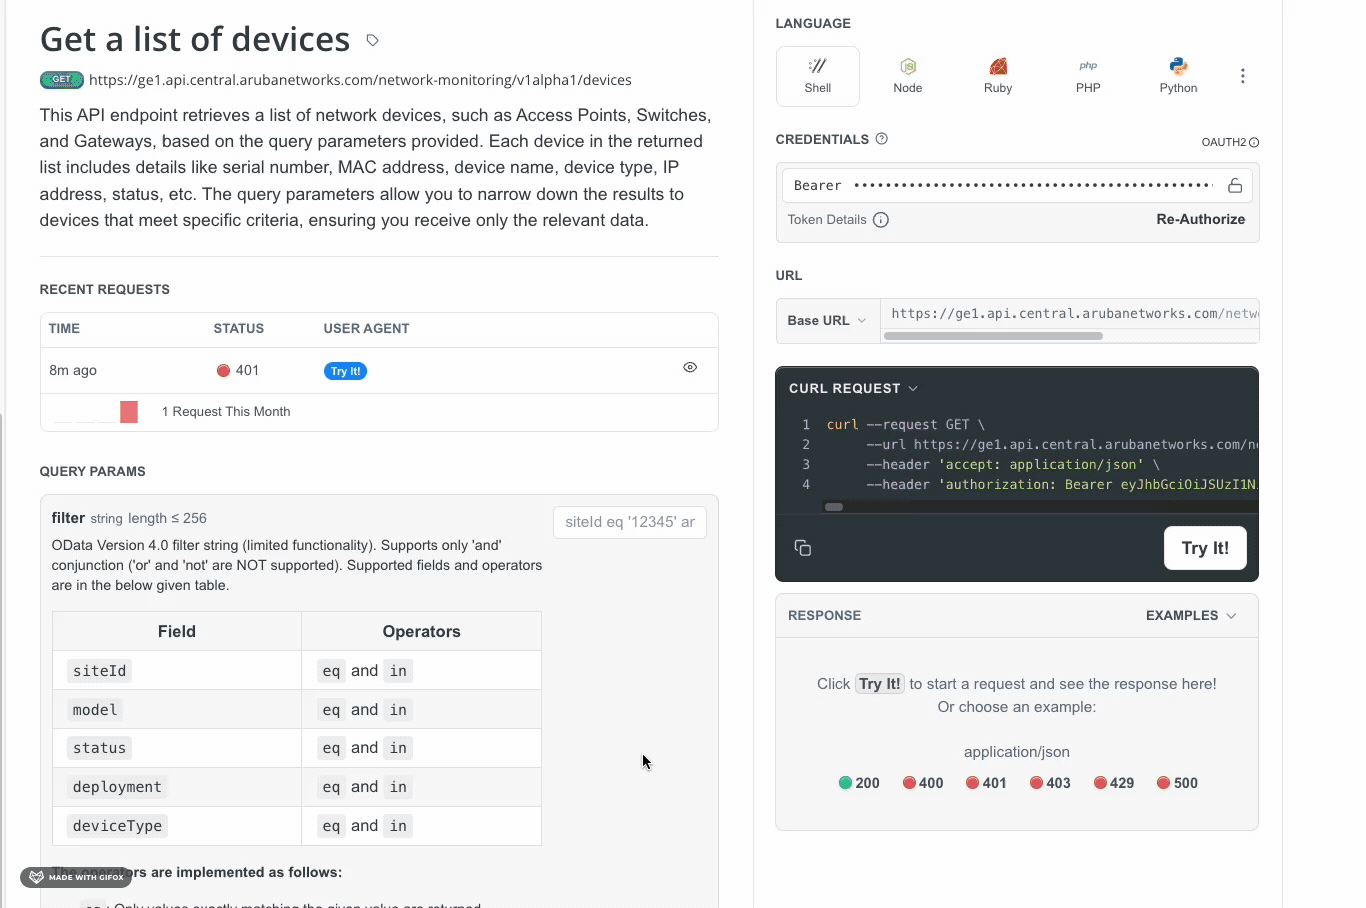
Understanding API Response
Once you've sent your API request, the API Reference Guide will display the response which consists of two parts:
- HTTP Status Code: This is returned by Central to indicate the result of your API request
- Response Body: This contains the actual data or message returned by the API
HTTP Status Code
The status code indicates the outcome of your request. Here are some common status codes you might encounter:
| Status Code | Description |
|---|---|
| 200 Ok | The request was successful and Central returned the expected response |
| 400 Bad Request | The request was invalid or malformed. Double-check the input parameters |
| 401 Unauthorized | Your access token is missing or invalid. Ensure the token is correctly provided in the Credentials field |
| 403 Forbidden | You do not have the necessary permissions to access this resource |
| 500 Internal Server Error | The server encountered an unexpected issue. Retry the request later. |
Response Body
The response body contains the actual data returned by the API. Here's an example response for the Get list of Devices endpoint:
{
    "items": [
        {
            "deviceName": "AP-2-2",
            "model": "AP-515",
            "partNumber": "Q9H63A",
            "ipv4": "192.167.102.7",
            "serialNumber": "Pxxxxxxxxx",
            "ipv6": "",
            "softwareVersion": "10.6.0.2_90095",
            "status": "ONLINE",
            "deviceType": "ACCESS_POINT",
            "siteId": "24xxxxxxxxx",
            "uptimeInMillis": 1280159964,
            "lastSeenAt": null,
            "buildingId": "",
            "floorId": "",
            "deployment": "Campus",
            "type": "network-monitoring/device-monitoring",
            "macAddress": "2x:xx:xx:xx:xx:xx",
            "id": "Pxxxxxxxxx",
            "persona": "Campus",
            "role": "-"
        },
        {
            "deviceName": "Automation-Central-01",
            "model": "CX-6300M",
            "partNumber": "JL662A",
            "ipv4": "192.168.0.119",
            "serialNumber": "Sxxxxxxxxx",
            "ipv6": null,
            "softwareVersion": "FL.10.07.0010",
            "status": "ONLINE",
            "deviceType": "SWITCH",
            "siteId": "7xxxxxxxxx",
            "uptimeInMillis": 3099690671,
            "lastSeenAt": null,
            "buildingId": null,
            "floorId": null,
            "deployment": "Standalone",
            "type": "network-monitoring/device-monitoring",
            "macAddress": "2x:xx:xx:xx:xx:xx",
            "id": "Sxxxxxxxxx",
            "persona": null,
            "role": null
        },
        {
            "deviceName": "GW-3-1",
            "model": "A9004",
            "partNumber": "R1B20A",
            "ipv4": "192.168.0.103",
            "serialNumber": "Txxxxxxxxx",
            "ipv6": "",
            "softwareVersion": "8.6.0.4-2.2.0.7_80444",
            "status": "ONLINE",
            "deviceType": "GATEWAY",
            "siteId": "7xxxxxxxxx",
            "uptimeInMillis": 2311730617,
            "lastSeenAt": null,
            "buildingId": null,
            "floorId": null,
            "deployment": "Standalone",
            "type": "network-monitoring/device-monitoring",
            "macAddress": "2x:xx:xx:xx:xx:xx",
            "id": "Txxxxxxxxx",
            "persona": null,
            "role": null
        }
    ],
    "total": 3,
    "count": 3,
    "next": null
}
You have now learned how to use our API Reference Guide to make API calls to Central. We encourage you to explore more API endpoints available in the Reference Guide. Each endpoint has detailed documentation to help you understand what it does and how to use it effectively. Start with simple GET requests and gradually explore more advanced endpoints.
Note
APIs with
v1alpha1are in an evolving state and may change with new releases. For the most accurate and up-to-date information, always refer to the API Reference Guide
For advanced users, our next guide covers how to use Central Postman Collection, which allows you to test & automate API calls efficiently
Updated 22 days ago