
Building a Local MCP Server w/ VSCode
Build Your Own Central MCP Server
A local MCP (Model Context Protocol) server that connects GitHub Copilot (or any MCP-compatible AI) to your HPE Aruba Networking Central account via the PyCentral v2 SDK. This project is one example of how to build your own MCP server. Use the code snippets and patterns below as a starting point and adapt them to your own tools and data sources.
Once running, you can ask your AI assistant natural language questions like:
- "List all my devices in Central"
- "Show me the health of all my sites"
- "What devices are at site X?"
AI Tool Usage Compliance
When using AI-assisted tools on your network, ensure you are following your organization's IT policies and security standards. This includes how data is shared with AI systems, how API credentials are stored and used, and what network information may be exposed. When in doubt, consult your IT or security team before proceeding.
Requirements
Before getting started, make sure you have the following:
| Requirement | Notes |
|---|---|
| VS Code | v1.99 or later recommended |
| GitHub Copilot | Requires an active Copilot subscription; any MCP-compatible AI client will also work |
| Python 3.10+ | Required by the MCP and PyCentral SDKs |
| PyCentral v2 SDK | Installed via pip in Step 2 |
| MCP Python SDK | Installed via pip in Step 2 |
| Central account | With API access enabled |
| HPE GreenLake Platform access | Needed to generate API client credentials |
Project Structure
central-mcp/
├── .vscode/
│   ├── mcp.json      ← Allows Visual Studio Code to access server
├── token.yaml        ← Your API credentials
├── shared.py         ← Initializes the MCP server and Central connection
├── server.py         ← Entry point — run this to start the server
├── tools/
│   ├── __init__.py   ← Registers all tools on startup
│   ├── devices.py    ← Device tools
│   └── sites.py      ← Site tools
└── README.md
token.yaml
token.yamlnew_central:
base_url: your-base-url
client_id: your-client-id
client_secret: your-client-secret
shared.py
shared.pyimport os
from mcp.server.fastmcp import FastMCP
from pycentral import NewCentralBase
# The MCP server instance — all tools register themselves onto this object
mcp = FastMCP("central-mcp")
# Shared Central connection — reused by all tool modules
# token.yaml must exist in the same directory as this file
TOKEN_FILE = os.path.join(os.path.dirname(__file__), "token.yaml")
conn = NewCentralBase(token_info=TOKEN_FILE)
tools/__init__.py
tools/__init__.py# Importing these modules causes their @mcp.tool() decorators to run,
# which registers each tool onto the shared `mcp` instance in shared.py.
from tools import devices, sites # noqa: F401
tools/devices.py
tools/devices.pyfrom shared import mcp, conn
from pycentral.new_monitoring import MonitoringDevices
@mcp.tool()
def list_all_devices() -> list:
"""
List all network devices that are onboarded and being actively monitored
in Central. Returns model, serial number, status, site, and more
for each device.
"""
return MonitoringDevices.get_all_devices(conn)
@mcp.tool()
def get_full_device_inventory() -> list:
"""
Get the complete device inventory from Central, including devices
that have not yet been onboarded/provisioned. Useful to see every device
associated with your account, not just monitored ones.
"""
return MonitoringDevices.get_all_device_inventory(conn)
tools/sites.py
tools/sites.pyfrom shared import mcp, conn
from pycentral.new_monitoring import MonitoringSites
@mcp.tool()
def list_all_sites() -> list:
"""
List all sites in Central, including health details such as device
counts, client counts, critical alert counts, and health status/reasons
for each site.
"""
return MonitoringSites.get_all_sites(conn)
@mcp.tool()
def get_site_info(site_id: int) -> dict:
"""
Get detailed health information for a specific site by its numeric ID.
Returns device health, client counts, and critical alerts for that site.
Args:
site_id: The numeric ID of the site (find IDs using list_all_sites).
"""
return MonitoringSites.list_site_information(conn, site_id)
@mcp.tool()
def get_sites_device_health() -> dict:
"""
Get per-site device health statistics for all sites. Returns a breakdown
of how many devices are in poor, fair, and good health at each site.
Useful for a quick network health overview across all locations.
"""
return MonitoringSites.list_sites_device_health(conn)
server.py
server.pyfrom shared import mcp, conn # noqa: F401 — triggers tool registration
import tools # registers all tools onto `mcp`
if __name__ == "__main__":
mcp.run()
Step 1 — Create and Activate a Virtual Environment
You need Python 3.10 or newer.
From the central-mcp/ folder:
python3 -m venv .venv
source .venv/bin/activate
On Windows (PowerShell):
py -m venv .venv
.venv\Scripts\Activate.ps1
Step 2 — Install Dependencies
With the virtual environment activated, install the two required packages:
pip3 install --pre pycentral mcp
PyCentral Version
PyCentralv2 is currently in pre-release.
--preis required to install the latest version.
Step 3 — Set Up Your Credentials
Open token.yaml and fill in your Central API credentials:
new_central:
  base_url: your-base-url
  client_id: your-client-id
  client_secret: your-client-secret
How to get these values:
For a more in-depth guide on gathering API credentials, please review this guide.
- Log in to the HPE GreenLake Platform
- Navigate to Manage → API Clients
- Create a new Personal API Client
- Copy the
client_idandclient_secret - Find your
base_urlfrom the regional base URLs table
token.yamlis listed in.gitignoreand will not be committed to Git.
Step 4 — Run the Server
cd ~/Desktop/central-mcp
source .venv/bin/activate
python server.py
The server will start and wait for tool calls over stdio. Keep this terminal open. You can open a separate terminal to check if the server is running using this command:
pgrep -af "server.py"
If you want to stop the server, just press Ctrl+C in the terminal where it's running.
If you configure the server through VS Code's dedicated MCP configuration in the next step, VS Code can launch this stdio server for you and you do not need to keep a separate terminal running.
Step 5 — Connect to VS Code
Create a .vscode/mcp.json file in your workspace. Do not add MCP servers to settings.json; VS Code expects them in the dedicated MCP configuration file.
{
  "servers": {
    "central-mcp": {
      "type": "stdio",
      "command": "/Users/your-username/Desktop/central-mcp/.venv/bin/python",
      "args": ["/Users/your-username/Desktop/central-mcp/server.py"]
    }
  }
}
Replace /Users/your-username/Desktop with your actual directory path to central-mcp. Using the .venv/bin/python interpreter ensures VS Code starts the server with the same environment where 'pycentral' and mcp were installed. After saving, reload VS Code and Copilot should detect the server and make the tools available.
Available Tools
Devices
| Tool | Description |
|---|---|
list_all_devices | List all monitored devices (model, serial, status, site, etc.) |
get_full_device_inventory | Full inventory including unprovisioned devices |
delete_device(serial_number) | Delete an offline device from Central |
Sites
| Tool | Description |
|---|---|
list_all_sites | List all sites with health details and alert counts |
get_site_info(site_id) | Detailed health info for one site by its numeric ID |
get_sites_device_health | Per-site breakdown of poor/fair/good device health |
Step 6 — Copilot Chat Integration with the MCP Server
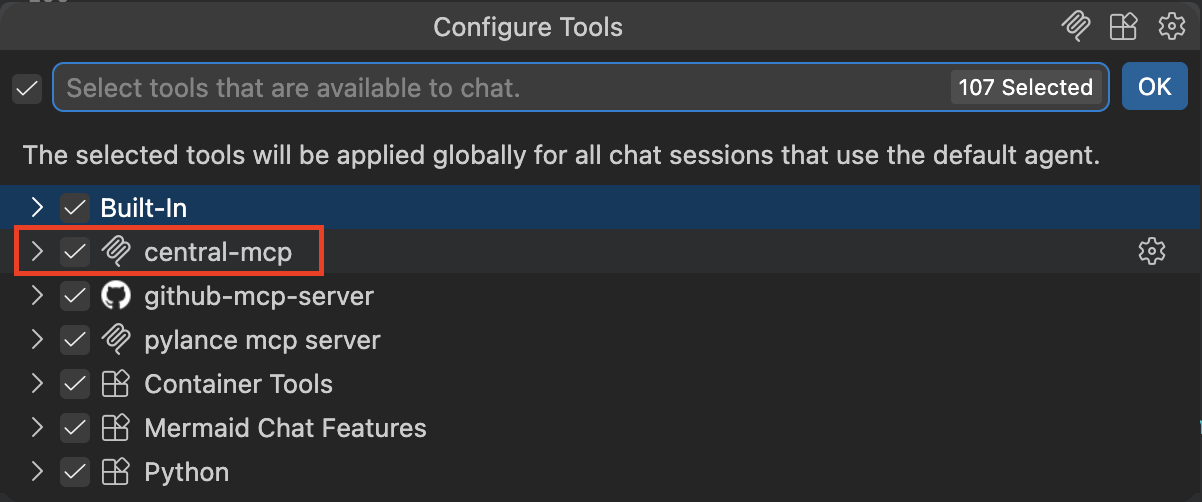
With the mcp.json configuration in place, open a new chat window with Github Copilot and switch to Agent mode. To double check that your agent has access to the MCP server follow these steps:
Note
The examples in this guide were generated using Claude Sonnet. Other models compatible with GitHub Copilot or MCP can also be used, but their responses and output formatting may differ from what is shown here.

Create a Chat Query
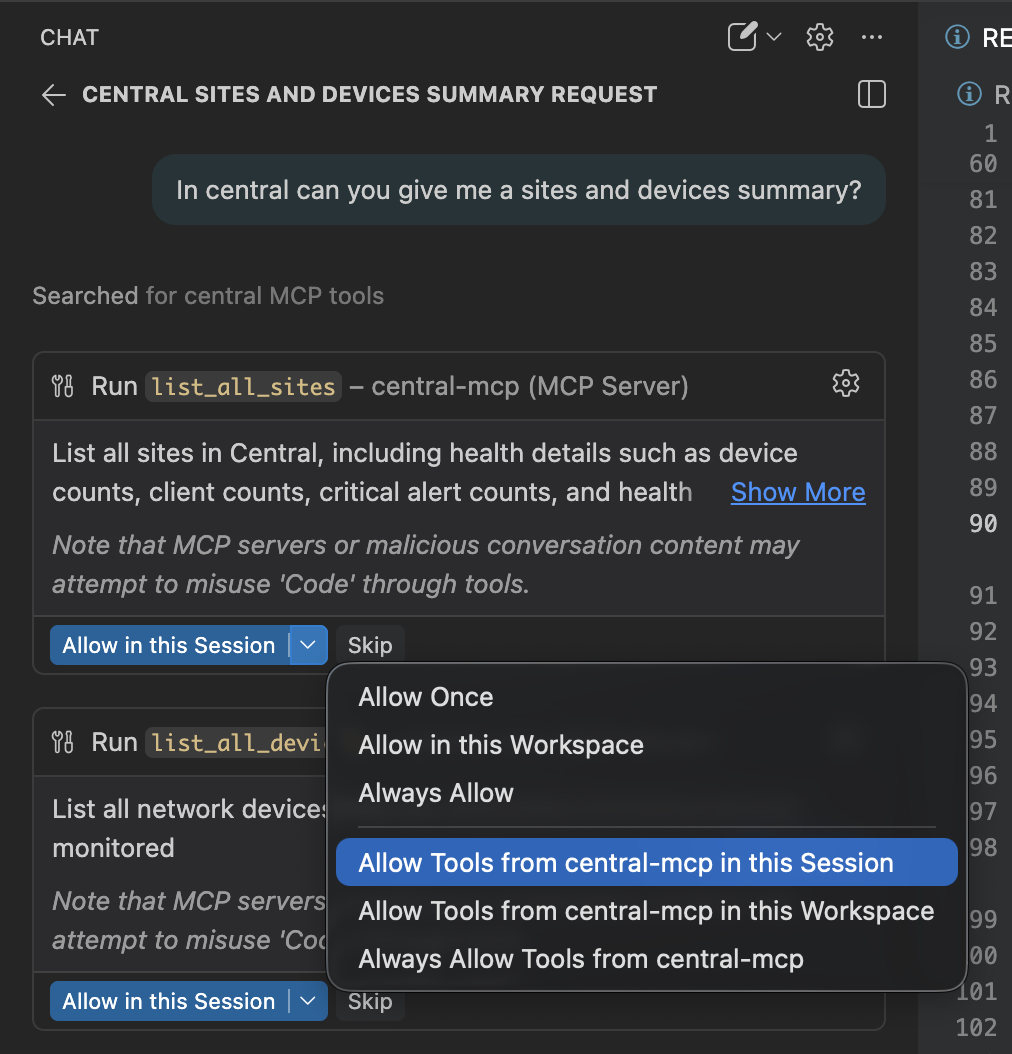
Create a query about your Central network pertaining to sites or devices. If needed, allow your Copilot to access the central-mcp that was created.
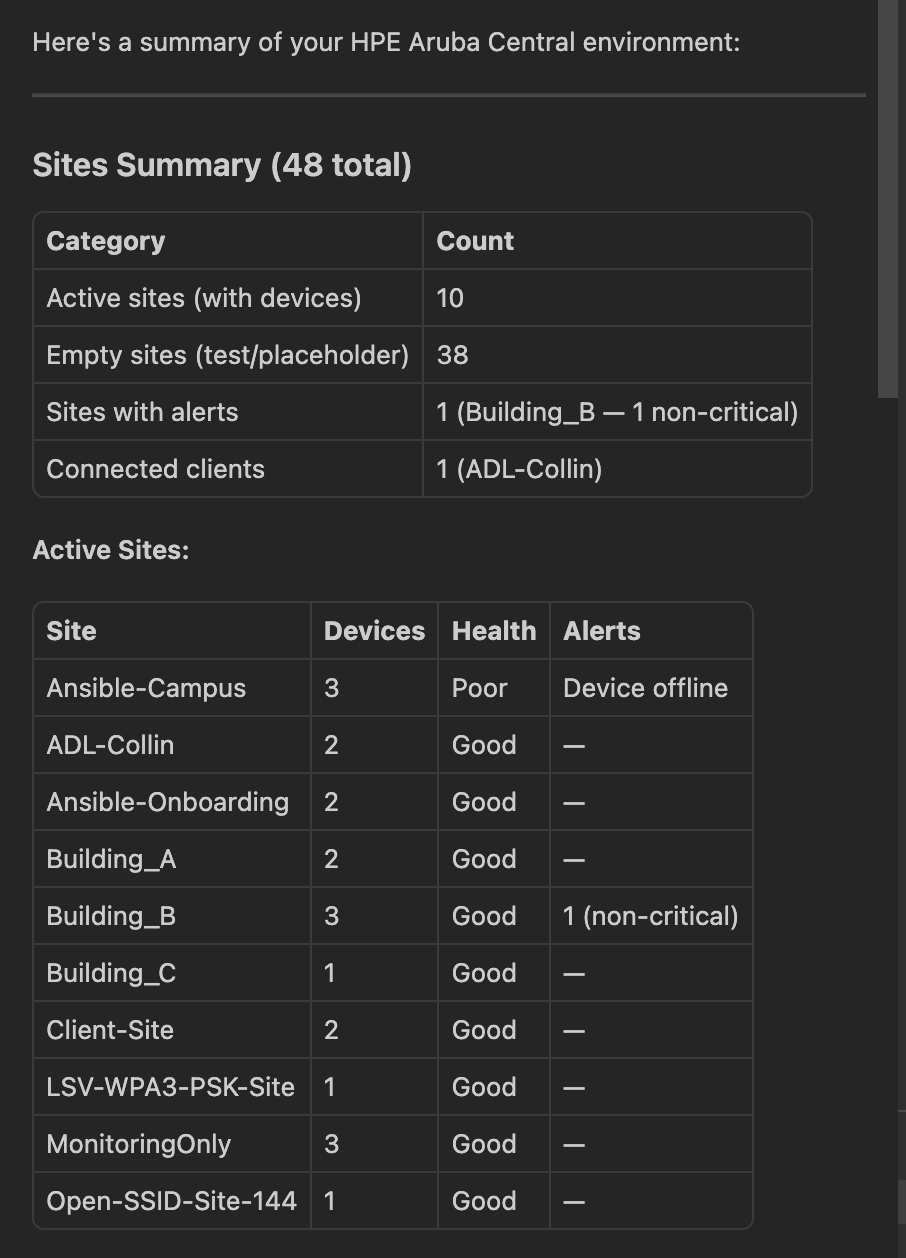
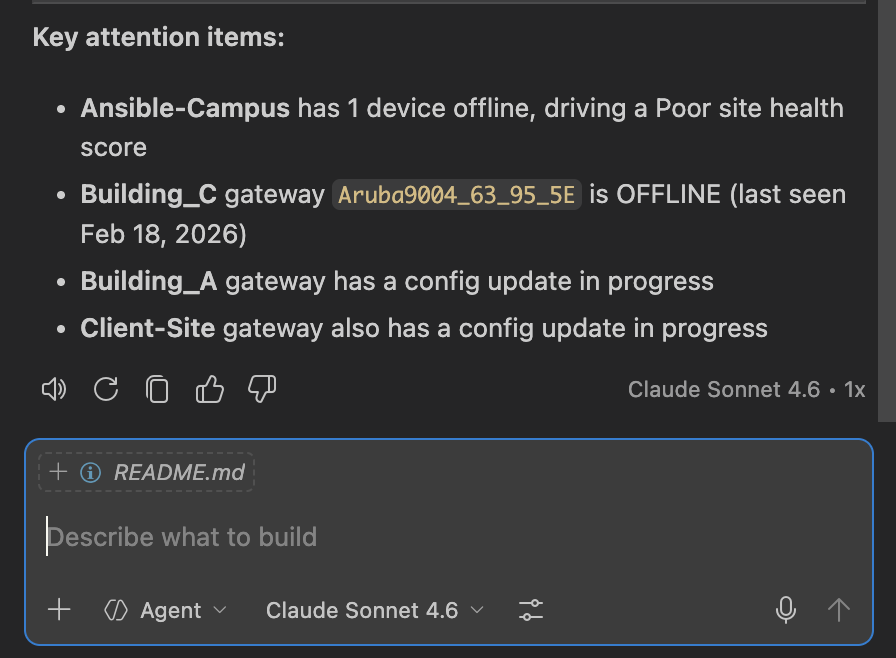
In central can you give me a sites and devices summary?
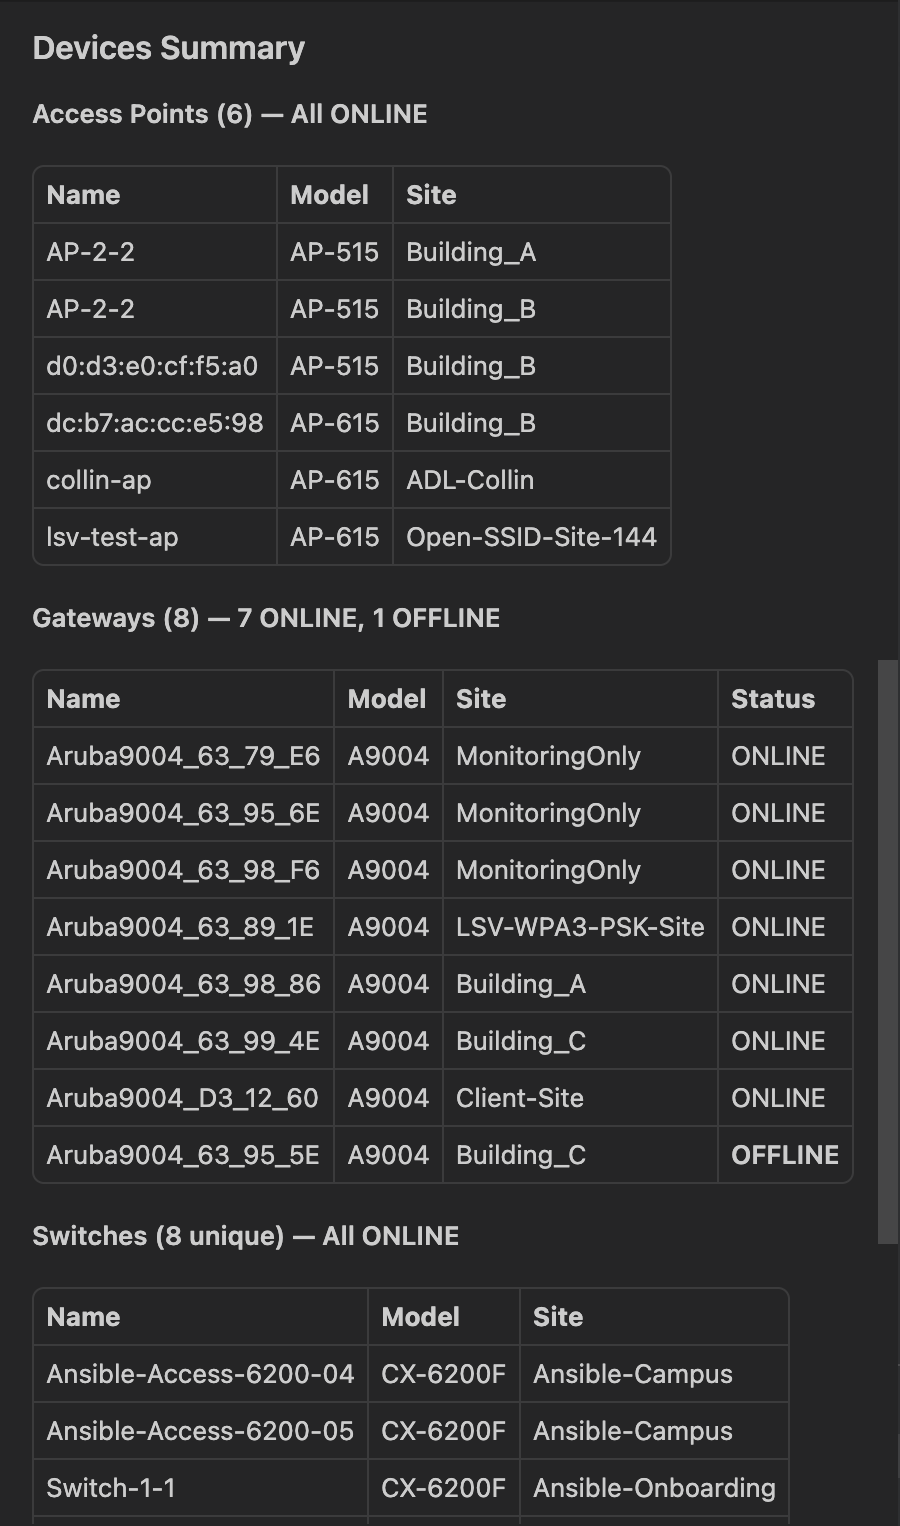
Submit the query to copilot chat and review the results. You should see that Copilot now has the ability to authenticate with your Central credentials and gather live data from the API endpoints in the tools functions that were created. Through the use of natural language queries, you can do live network monitoring!
How to Add More Tools
The MCP server that you have now created is just the start. There are many available endpoints in the PyCentral SDK that you can plug into the MCP server as more tools. The pattern is the same for every tool. Open tools/devices.py or tools/sites.py and add a new function with the @mcp.tool() decorator:
@mcp.tool()
def my_new_tool(some_param: str) -> dict:
    """Describe what this tool does — the AI reads this description."""
    return SomePyCentralClass.some_method(conn, some_param)
PyCentral v2 covers many more modules you can wrap the same way:
| Module | Import | What it covers |
|---|---|---|
| new_monitoring.aps | MonitoringAPs | Access points, WLANs |
| new_monitoring.clients | Clients | Wireless/wired clients |
| new_monitoring.gateways | MonitoringGateways | Gateways, tunnels |
| glp | GLP classes | GreenLake Platform APIs |
| profiles | Profile classes | Device configuration profiles |
| troubleshooting | Troubleshooting classes | Ping, iPerf tests |
Full SDK reference: https://pycentral.readthedocs.io/en/v2/
Troubleshooting
ModuleNotFoundError: pycentral
Run pip3 install --pre pycentral and make sure you're using the same Python that VS Code is using.
FileNotFoundError: token.yaml
Make sure token.yaml exists in the central-mcp/ folder and is filled in with real credentials.
401 Unauthorized from API calls
Your client_id or client_secret is incorrect, or the API client does not have the required permissions. Check your credentials in the GreenLake Platform.
Tools not showing up in Copilot
If you are launching the server manually, make sure it is running with python server.py. If you are using .vscode/mcp.json, make sure the command points to your .venv/bin/python interpreter and the args path points to server.py, then reload VS Code.
central-mcp not visible in tools
Ensure VS Code and Github Copilot Chat are up to date. You may have to close all windows of VS Code to intiae the update process.
Updated 3 days ago